18 KiB
Implementing a Read-Only MCP Server for Neo4j in Go (SSE)
Introduction
This tutorial demonstrates how to use Go to create an MCP server that can access a Neo4j database. Once implemented, you can query the server's status via a large language model (LLM) without writing any additional query code.
Unlike previous connection methods, this time we’ll use Server-Sent Events (SSE) to create and connect the server.
The code for this tutorial: https://github.com/LSTM-Kirigaya/openmcp-tutorial/tree/main/neo4j-go-server
It’s recommended to download the code for this tutorial, as it includes a pre-prepared database file. Otherwise, you’ll need to mock the data yourself.
1. Preparation
The project structure is as follows:
📦neo4j-go-server
 ┣ 📂util
 ┃ ┗ 📜util.go      # Utility functions
 ┣ 📜main.go        # Main function
 ┗ 📜neo4j.json     # Database connection credentials
First, create a Go project:
mkdir neo4j-go-server
cd neo4j-go-server
go mod init neo4j-go-server
2. Database Initialization
2.1 Install Neo4j
First, set up a Neo4j database locally or on a server following this tutorial. You only need to complete the first two steps. Add the bin path to your environment variables and set the password to openmcp.
Next, create neo4j.json in the same directory as main.go and fill in the connection details:
{
    "url": "neo4j://localhost:7687",
    "name": "neo4j",
    "password": "openmcp"
}
2.2 Import Pre-Prepared Data
After installation, import the pre-prepared data. This data is an anonymized excerpt from my personal website and can be freely used. Download link: neo4j.db. After downloading, run the following commands:
neo4j stop
neo4j-admin load --database neo4j --from neo4j.db --force
neo4j start
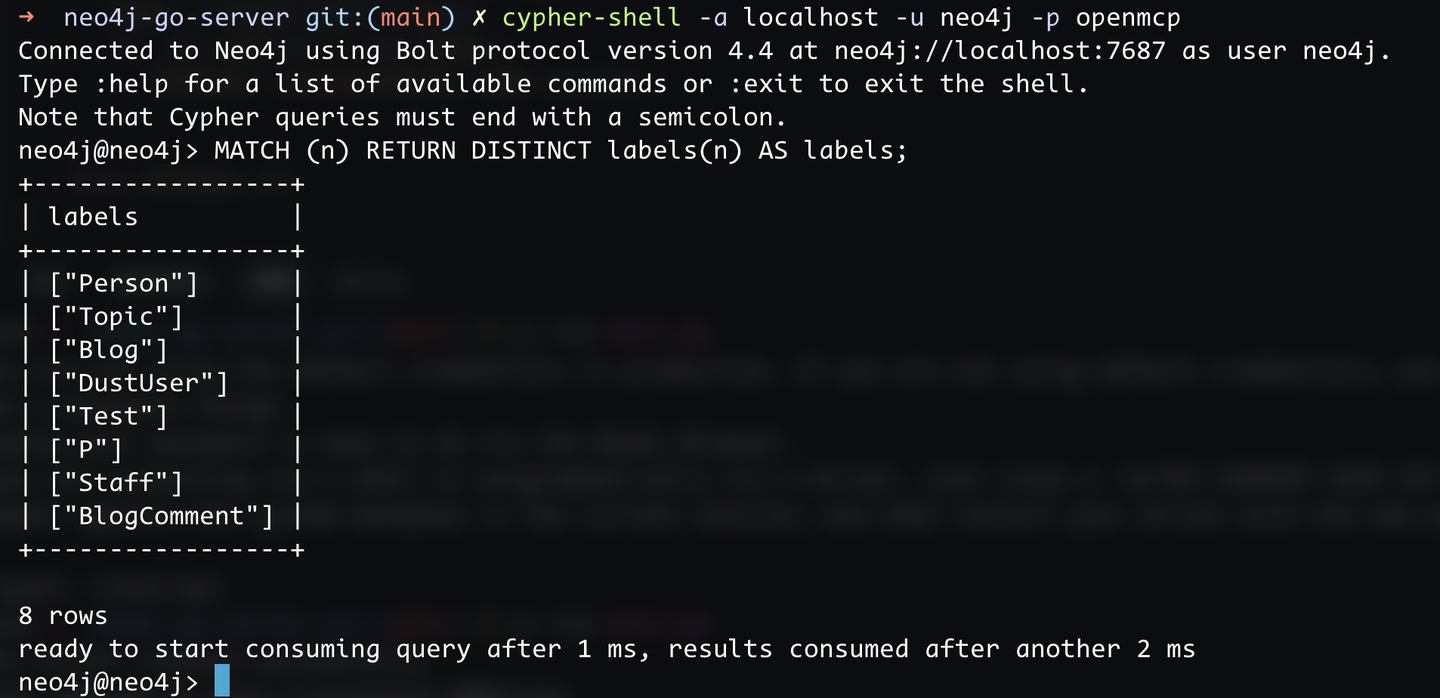
Then, log in to the database to see the imported data:
cypher-shell -a localhost -u neo4j -p openmcp
2.3 Verify Go-to-Database Connectivity
To verify connectivity and the Go driver’s functionality, we’ll first implement a minimal database access system.
Install the Neo4j Go driver (v5):
go get github.com/neo4j/neo4j-go-driver/v5
Add the following code to util.go:
package util

import (
	"context"
	"encoding/json"
	"fmt"
	"os"

	"github.com/neo4j/neo4j-go-driver/v5/neo4j"
)

var (
	Neo4jDriver neo4j.DriverWithContext
)

// Create a connection to the Neo4j server
func CreateNeo4jDriver(configPath string) (neo4j.DriverWithContext, error) {
	jsonString, _ := os.ReadFile(configPath)
	config := make(map[string]string)

	json.Unmarshal(jsonString, &config)

	var err error
	Neo4jDriver, err = neo4j.NewDriverWithContext(
		config["url"],
		neo4j.BasicAuth(config["name"], config["password"], ""),
	)
	if err != nil {
		return Neo4jDriver, err
	}
	return Neo4jDriver, nil
}

// Execute a read-only Cypher query
func ExecuteReadOnlyCypherQuery(
	cypher string,
) ([]map[string]any, error) {
	session := Neo4jDriver.NewSession(context.TODO(), neo4j.SessionConfig{
		AccessMode: neo4j.AccessModeRead,
	})

	defer session.Close(context.TODO())

	result, err := session.Run(context.TODO(), cypher, nil)
	if err != nil {
		fmt.Println(err.Error())
		return nil, err
	}

	var records []map[string]any
	for result.Next(context.TODO()) {
		records = append(records, result.Record().AsMap())
	}

	return records, nil
}
Add the following code to main.go:
package main

import (
	"fmt"
	"neo4j-go-server/util"
)

var (
	neo4jPath string = "./neo4j.json"
)

func main() {
	_, err := util.CreateNeo4jDriver(neo4jPath)
	if err != nil {
		fmt.Println(err)
		return
	}

	fmt.Println("Neo4j driver created successfully")
}
Run the program to verify database connectivity:
go run main.go
If the output is Neo4j driver created successfully, the connection is successful.
3. Implement the MCP Server
The most popular Go MCP SDK is mark3labs/mcp-go. We’ll use this.
The demo for
mark3labs/mcp-gois at https://github.com/mark3labs/mcp-go. It’s very simple, so we’ll use it directly.
Install it first:
go get github.com/mark3labs/mcp-go
Then, add the following code to main.go:
// ... existing code ...

var (
	addr string = "localhost:8083"
)

func main() {
	// ... existing code ...

	s := server.NewMCPServer(
		"Read-Only Neo4j Server",
		"0.0.1",
		server.WithToolCapabilities(true),
	)

	srv := server.NewSSEServer(s)

	// Define the schema for the `executeReadOnlyCypherQuery` tool
	executeReadOnlyCypherQuery := mcp.NewTool("executeReadOnlyCypherQuery",
		mcp.WithDescription("Execute a read-only Cypher query"),
		mcp.WithString("cypher",
			mcp.Required(),
			mcp.Description("Cypher query statement (must be read-only)"),
		),
	)

	// Bind the actual function to the declared schema
	s.AddTool(executeReadOnlyCypherQuery, func(ctx context.Context, request mcp.CallToolRequest) (*mcp.CallToolResult, error) {
		args, ok := request.Params.Arguments.(map[string]interface{})
		if !ok {
			return mcp.NewToolResultText(""), fmt.Errorf("invalid arguments type")
		}
		cypher, ok := args["cypher"].(string)
		if !ok {
			return mcp.NewToolResultText(""), fmt.Errorf("cypher argument is not a string")
		}
		result, err := util.ExecuteReadOnlyCypherQuery(cypher)

		fmt.Println(result)

		if err != nil {
			return mcp.NewToolResultText(""), err
		}

		return mcp.NewToolResultText(fmt.Sprintf("%v", result)), nil
	})

	// Start the server at http://localhost:8083/sse
	fmt.Printf("Server started at http://%s/sse\n", addr)
	srv.Start(addr)
}
Run the server:
go run main.go
You should see the following output:
Neo4j driver created successfully
Server started at http://localhost:8083/sse
This means the MCP server is running locally on port 8083.
4. Debugging with OpenMCP
4.1 Add the Workspace SSE Debugging Project
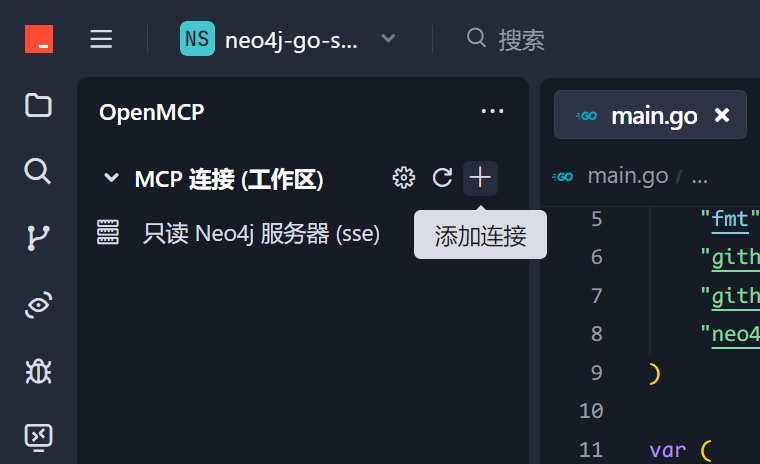
Next, we’ll debug using OpenMCP. Click the OpenMCP icon on the left side of VSCode to enter the control panel. If you downloaded the project from https://github.com/LSTM-Kirigaya/openmcp-tutorial/tree/main/neo4j-go-server, you’ll see a pre-configured debugging project named "Read-Only Neo4j Server" under "MCP Connections (Workspace)". If you built this project from scratch, you can add the connection manually by selecting SSE and entering http://localhost:8083/sse (leave OAuth blank).
4.2 Test the Tool
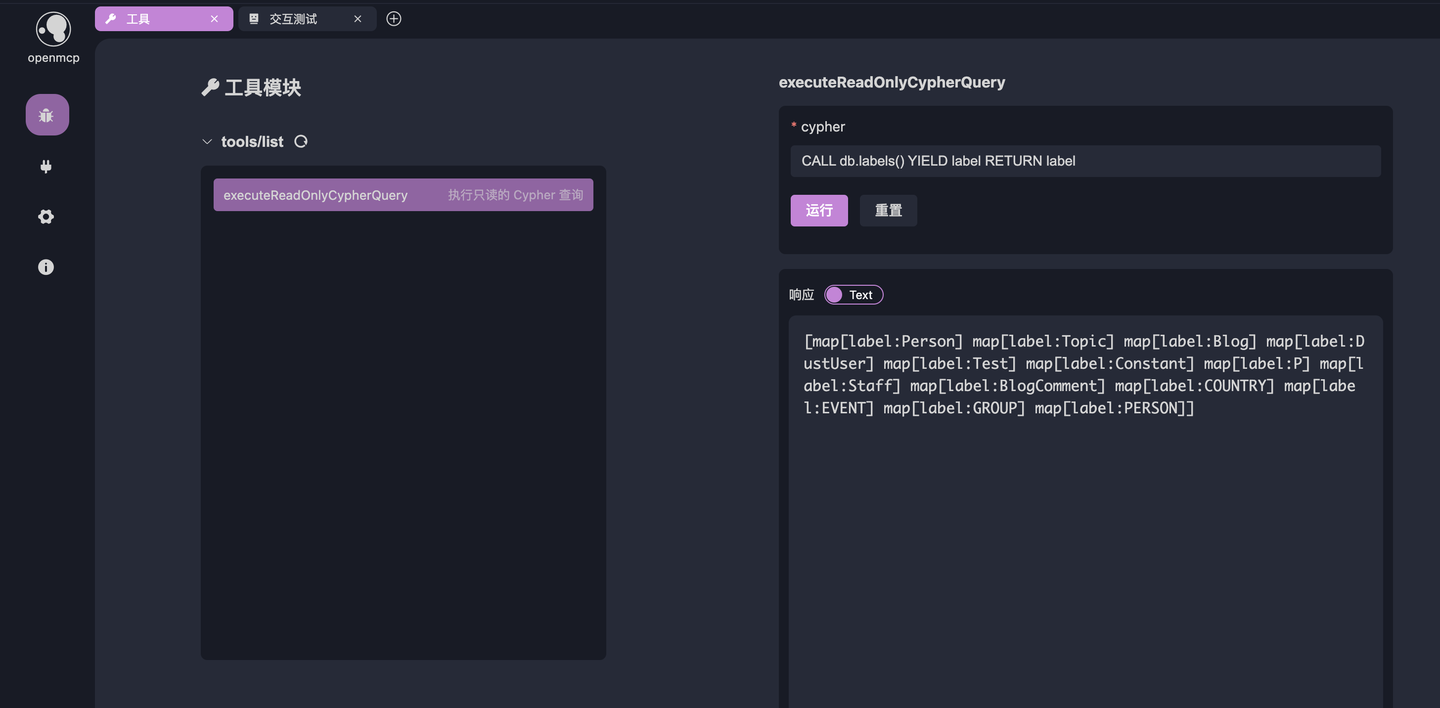
The first step in debugging an MCP server is always testing the MCP tool. Create a new tab, select "Tool," click the tool shown below, and enter CALL db.labels() YIELD label RETURN label. This query lists all node types. If the output matches the expected result, the connection is working correctly.
4.3 Explore the LLM’s Capabilities and Use Prompts to Encapsulate Knowledge
Now, let’s do something fun! We’ll test the LLM’s boundaries because Neo4j is a specialized database, and general-purpose LLMs may not know how to use it. Create a new tab, click "Interactive Test," and ask a simple question:
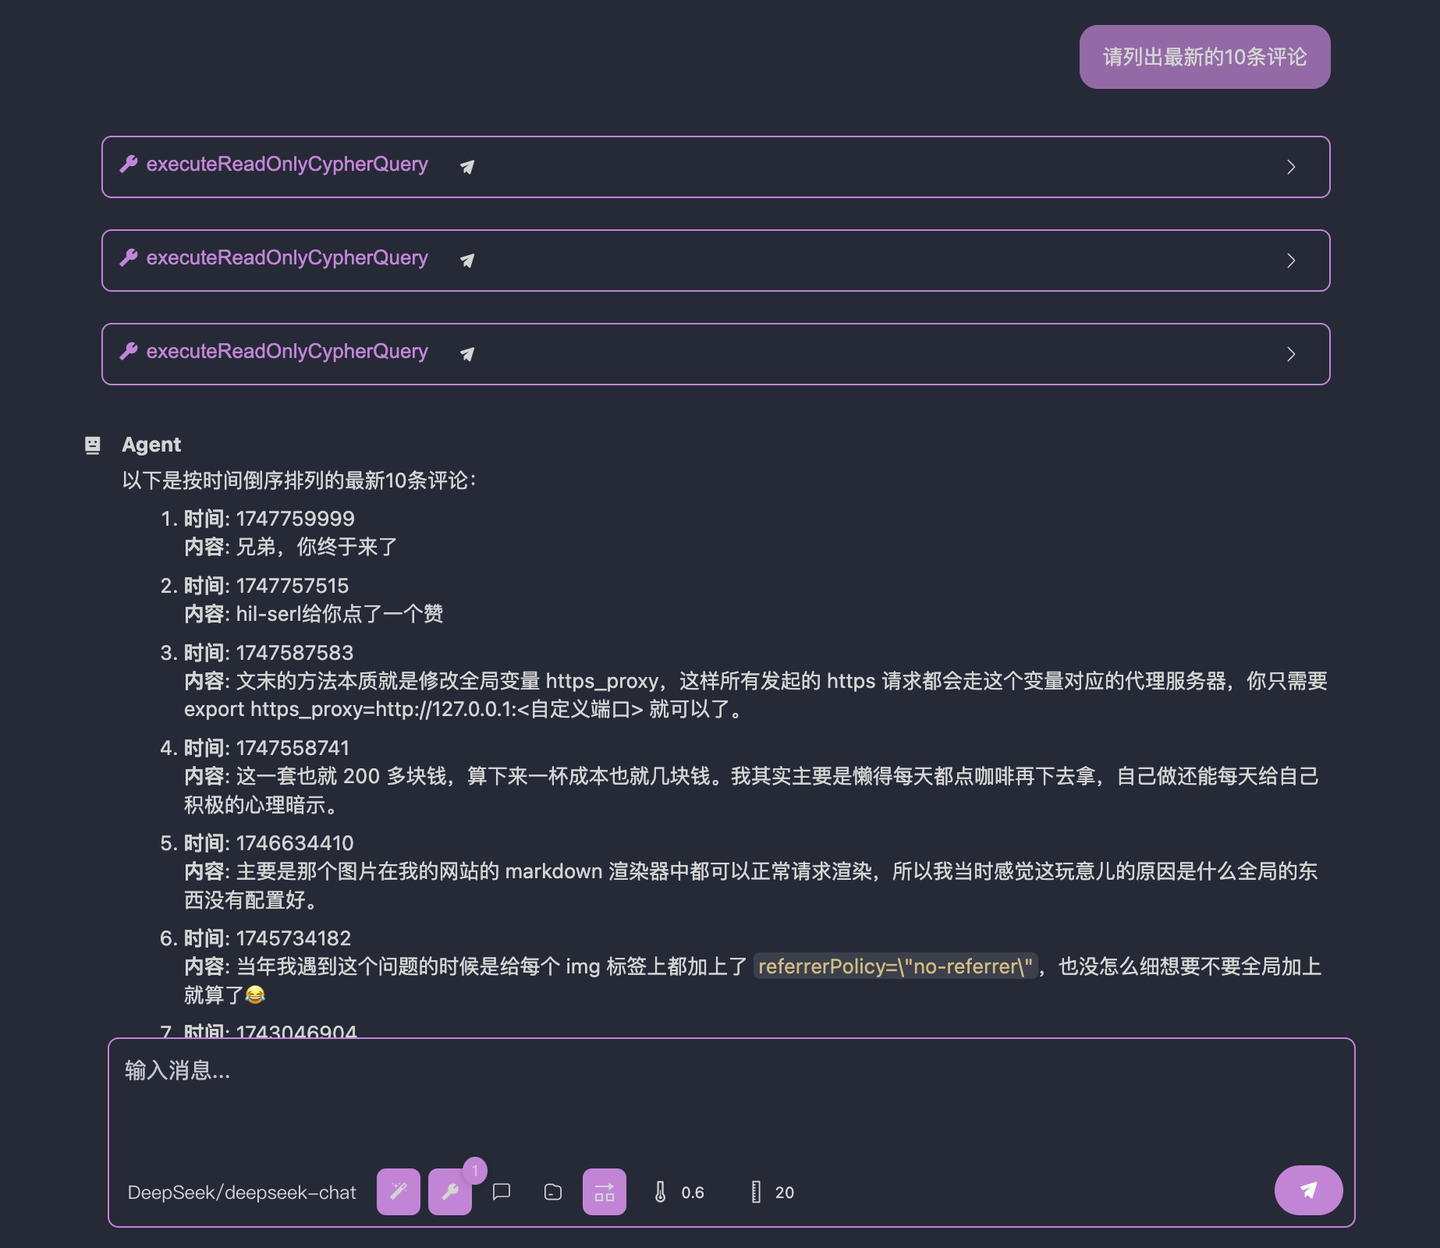
Find the latest 10 comments for me.
The result is as follows:
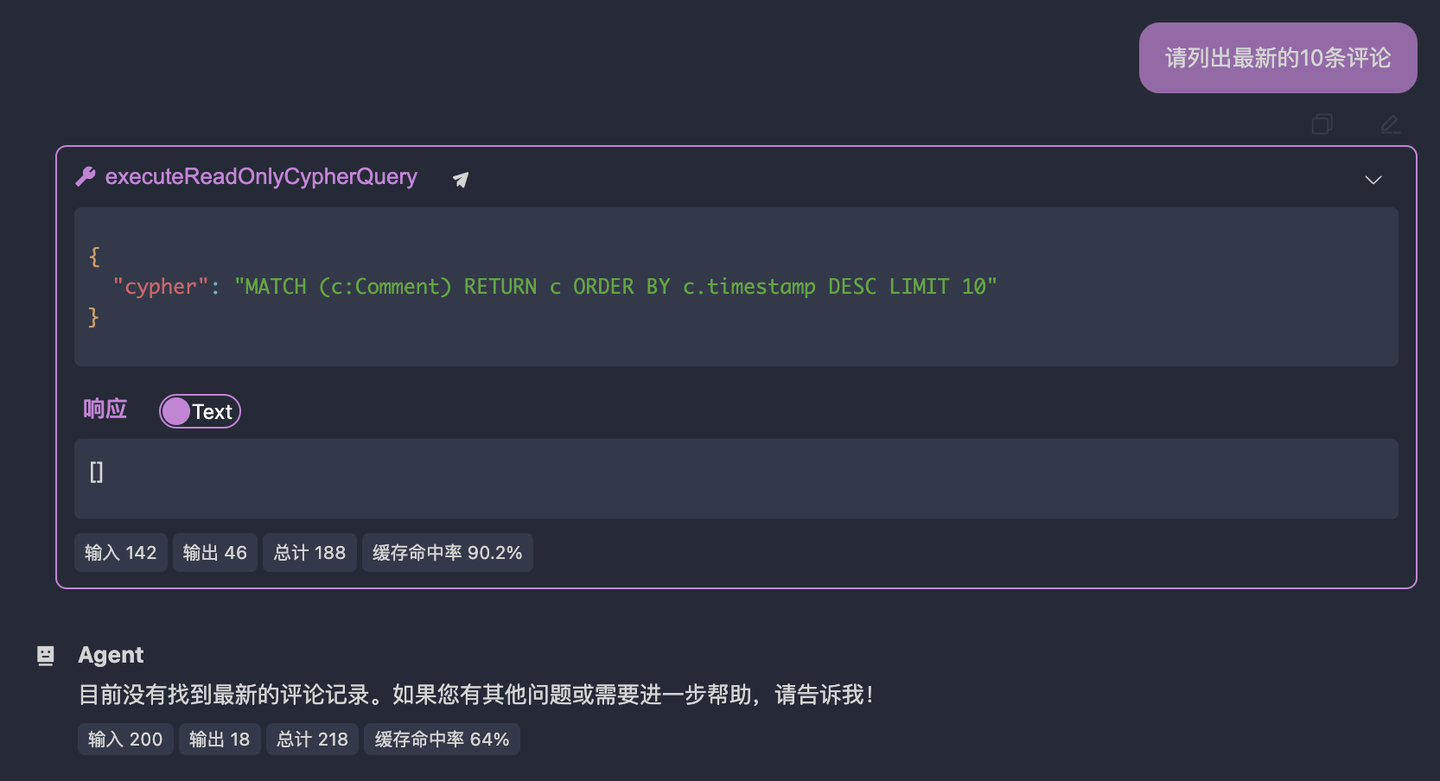
You can see that the LLM queried the wrong node type. In my example, the node representing comments is BlogComment, not Comment. This means the LLM doesn’t have a general methodology for querying databases. This is its current boundary. We’ll now inject our experience and knowledge step by step through the system prompt.
4.4 Teach the LLM to Find Database Nodes
Think about it: How do we engineers know that the comment node is BlogComment? We usually list all node types in the database and guess from the naming. For this database, I’d first run the following Cypher query:
CALL db.labels() YIELD label RETURN label
The output is shown in Figure 4.2. If your English is decent, you can guess that BlogComment is likely the node for blog comments. Now, let’s inject this methodology into the system prompt to encapsulate this knowledge. Click the button at the bottom of the image below to enter "System Prompts":
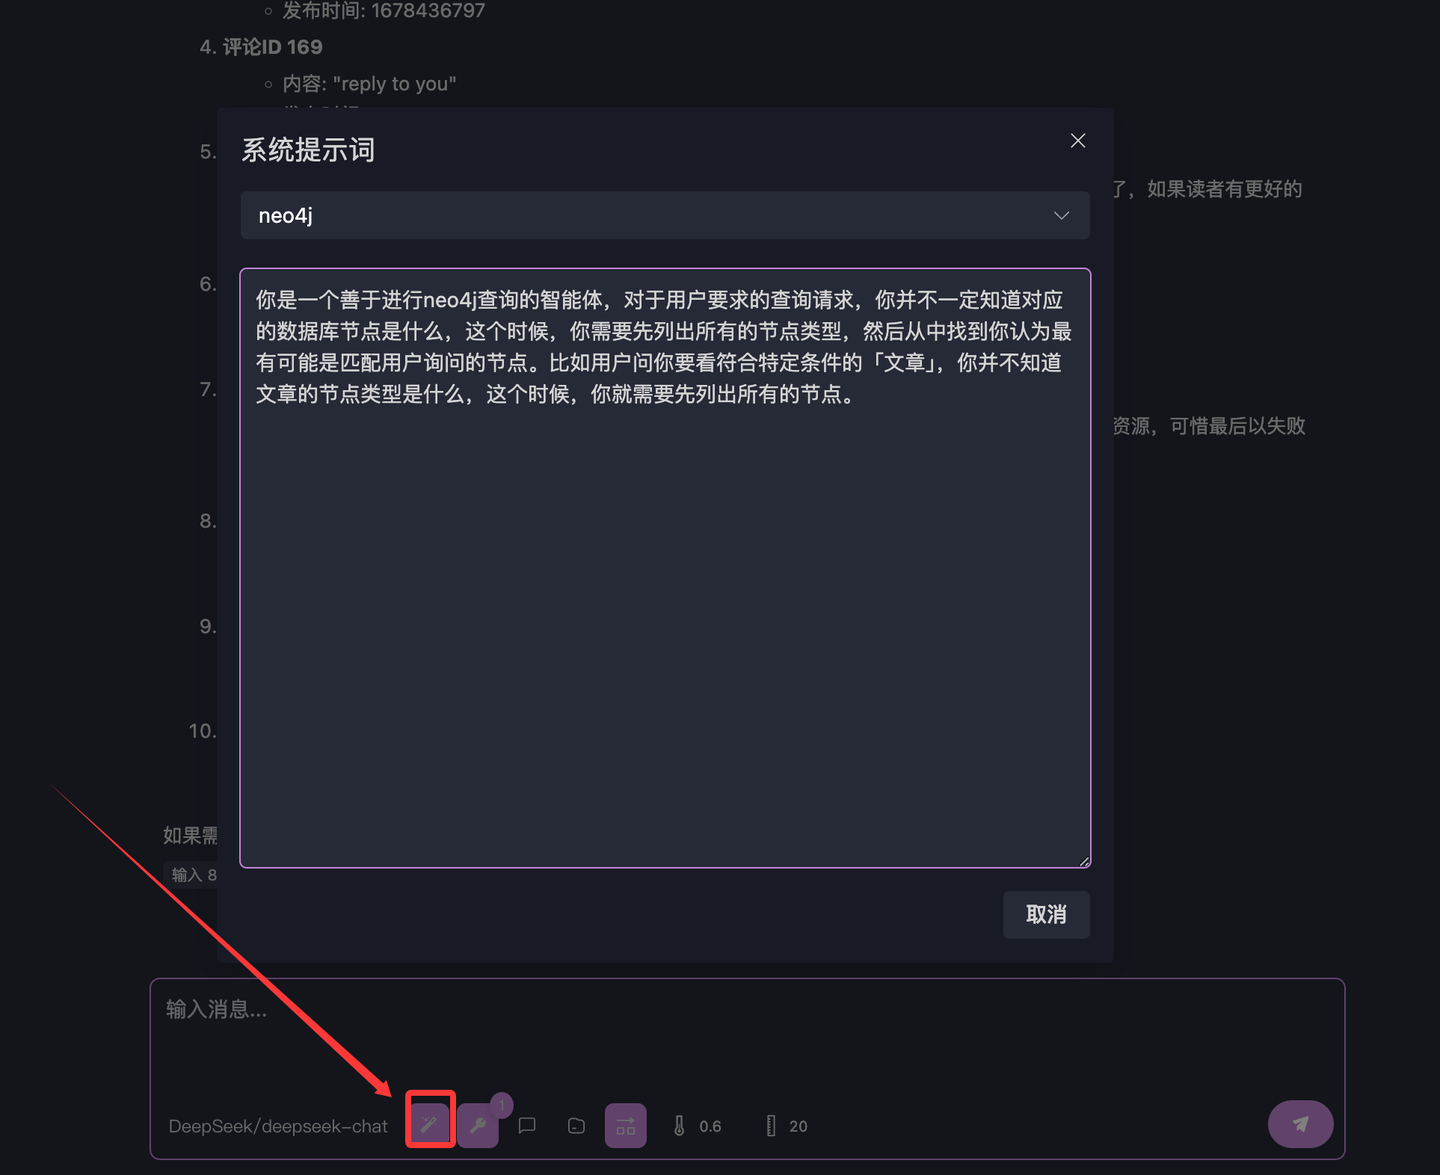
Create a new prompt named "neo4j" and enter:
You are an agent skilled in Neo4j queries. For user requests, you may not know the corresponding database nodes. In such cases, you should first list all node types and identify the most likely match for the user’s query. For example, if the user asks for "articles" matching certain criteria, you don’t know the node type for articles, so you need to list all nodes first.
Click "Save," then repeat the earlier question in "Interactive Test":
Find the latest 10 comments for me.
The LLM’s response is now:

Much better, right? The LLM successfully found the BlogComment node and returned the corresponding data.
However, it’s still not quite right. We asked for the "latest" 10 comments, but the LLM returned the "earliest" 10. Looking at the LLM’s call details, we can see it used ORDER BY comment.createdAt. The problem is that in our database, the field recording when a comment was created is not createdAt but createdTime. This means the LLM doesn’t know it doesn’t know the node’s fields, leading to "hallucinations" where it makes up a field.
LLMs won’t explicitly admit ignorance. Research on OOD (Out-of-Distribution) by Jinhui during his graduate studies explains the fundamental reason: EDL (Evidential Deep Learning) Principles and Code Implementation. If your curiosity matches your mathematical skills, give this article a try. In short, because LLMs hallucinate about things they don’t know, we have room to inject our experience.
4.5 Teach the LLM to Find Database Node Fields
From the above attempt, we know we’re close to the finish line. We just need to tell the LLM that in our database, the field recording when a comment was created is createdTime, not createdAt.
To teach the LLM about fields, let’s refine the system prompt:
You are an agent skilled in Neo4j queries. For user requests, you may not know the corresponding database nodes. In such cases, you should first list all node types and identify the most likely match for the user’s query. For example, if the user asks for "articles" matching certain criteria, you don’t know the node type for articles, so you need to list all nodes first.

For specific queries, you should first query a few examples to see what fields the node type has. For example, if the user asks for the "latest articles," you don’t know which field represents the "creation time," so you need to list one or two article nodes to see the available fields before querying the latest 10 articles.
The result is now:
Perfect, right?
By using OpenMCP for debugging, we can uniquely determine an agent’s behavior through the system prompt + MCP server.
5. Expand the MCP Server’s Atomic Skills
In the above example, although we injected our experience and knowledge through the system prompt, you’ll notice that behaviors like "query all node types" and "get all fields of a node" are very fixed processes. However, system prompts are written in natural language, which is inherently ambiguous. We can’t guarantee they’ll always be extensible. Besides system prompts, is there another way to inject our experience and knowledge? Yes, there is.
For processes that are fixed and easily conceivable by "somewhat experienced people," besides using system prompts, we can also standardize knowledge injection by writing these processes as additional MCP tools. This method is called "Atomization Supplement."
Atomization Supplement involves adding extra MCP tools that are "atomic" in functionality.
A tool is called an "Atomic Tool" if it meets one of the following conditions:
- The tool cannot be obtained by combining finer-grained functionalities in a limited way.
- The finer-grained functionalities used to compose the tool are not fully or reliably used by the LLM (e.g., assembly language, DOM queries).
Adding extra atomic tools lets the LLM know, "Ah! I have other tricks up my sleeve!" As long as the descriptions are appropriate, the LLM can use them to gather additional information instead of hallucinating and failing the task.
For the above process, we’ve identified two areas where the LLM hallucinates:
- Getting the label of a node type (e.g., asking for "comments," the LLM doesn’t admit it doesn’t know the label and directly uses
Comment, but the actual label isBlogComment). - Getting the fields of a node type (e.g., asking for the "latest comments," the LLM sorts by
createdAt, but the field recording creation time iscreatedTime).
Earlier, we used the system prompt to inject this knowledge. Now, discard your system prompt! Let’s play a more interesting game. In util.go, we’ll implement two additional functions for the above hallucinations (tested, cursor or trae can generate this code perfectly, so you don’t need to write it yourself):
// Get all node types
func GetAllNodeTypes() ([]string, error) {
	cypher := "MATCH (n) RETURN DISTINCT labels(n) AS labels"
	result, err := ExecuteReadOnlyCypherQuery(cypher)
	if err != nil {
		return nil, err
	}
	var nodeTypes []string
	for _, record := range result {
		labels := record["labels"].([]any)
		for _, label := range labels {
			nodeTypes = append(nodeTypes, label.(string))
		}
	}
	return nodeTypes, nil
}

// Get an example of a node's fields
func GetNodeFields(nodeType string) ([]string, error) {
	cypher := fmt.Sprintf("MATCH (n:%s) RETURN keys(n) AS keys LIMIT 1", nodeType)
	result, err := ExecuteReadOnlyCypherQuery(cypher)
	if err != nil {
		return nil, err
	}
	var fields []string
	for _, record := range result {
		keys := record["keys"].([]any)
		for _, key := range keys {
			fields = append(fields, key.(string))
		}
	}
	return fields, nil
}
In main.go, declare their schemas and register the tools:
// ... existing code ...

	getAllNodeTypes := mcp.NewTool("getAllNodeTypes",
		mcp.WithDescription("Get all node types"),
	)

	getNodeField := mcp.NewTool("getNodeField",
		mcp.WithDescription("Get the fields of a node"),
		mcp.WithString("nodeLabel",
			mcp.Required(),
			mcp.Description("The label of the node"),
		),
	)

	// Register the tools with the schema
	s.AddTool(getAllNodeTypes, func(ctx context.Context, request mcp.CallToolRequest) (*mcp.CallToolResult, error) {
		result, err := util.GetAllNodeTypes()

		fmt.Println(result)

		if err != nil {
			return mcp.NewToolResultText(""), err
		}

		return mcp.NewToolResultText(fmt.Sprintf("%v", result)), nil
	})

	s.AddTool(getNodeField, func(ctx context.Context, request mcp.CallToolRequest) (*mcp.CallToolResult, error) {
		args, ok := request.Params.Arguments.(map[string]interface{})
		if !ok {
			return mcp.NewToolResultText(""), fmt.Errorf("invalid arguments type")
		}
		nodeLabel, ok := args["nodeLabel"].(string)
		if !ok {
			return mcp.NewToolResultText(""), fmt.Errorf("nodeLabel argument is not a string")
		}
		result, err := util.GetNodeFields(nodeLabel)

		fmt.Println(result)

		if err != nil {
			return mcp.NewToolResultText(""), err
		}

		return mcp.NewToolResultText(fmt.Sprintf("%v", result)), nil
	})

// ... existing code ...
Restart the SSE server and directly ask the LLM. This time, we’ll disable the system prompt (create an empty one or delete the current prompt). The result is as follows:
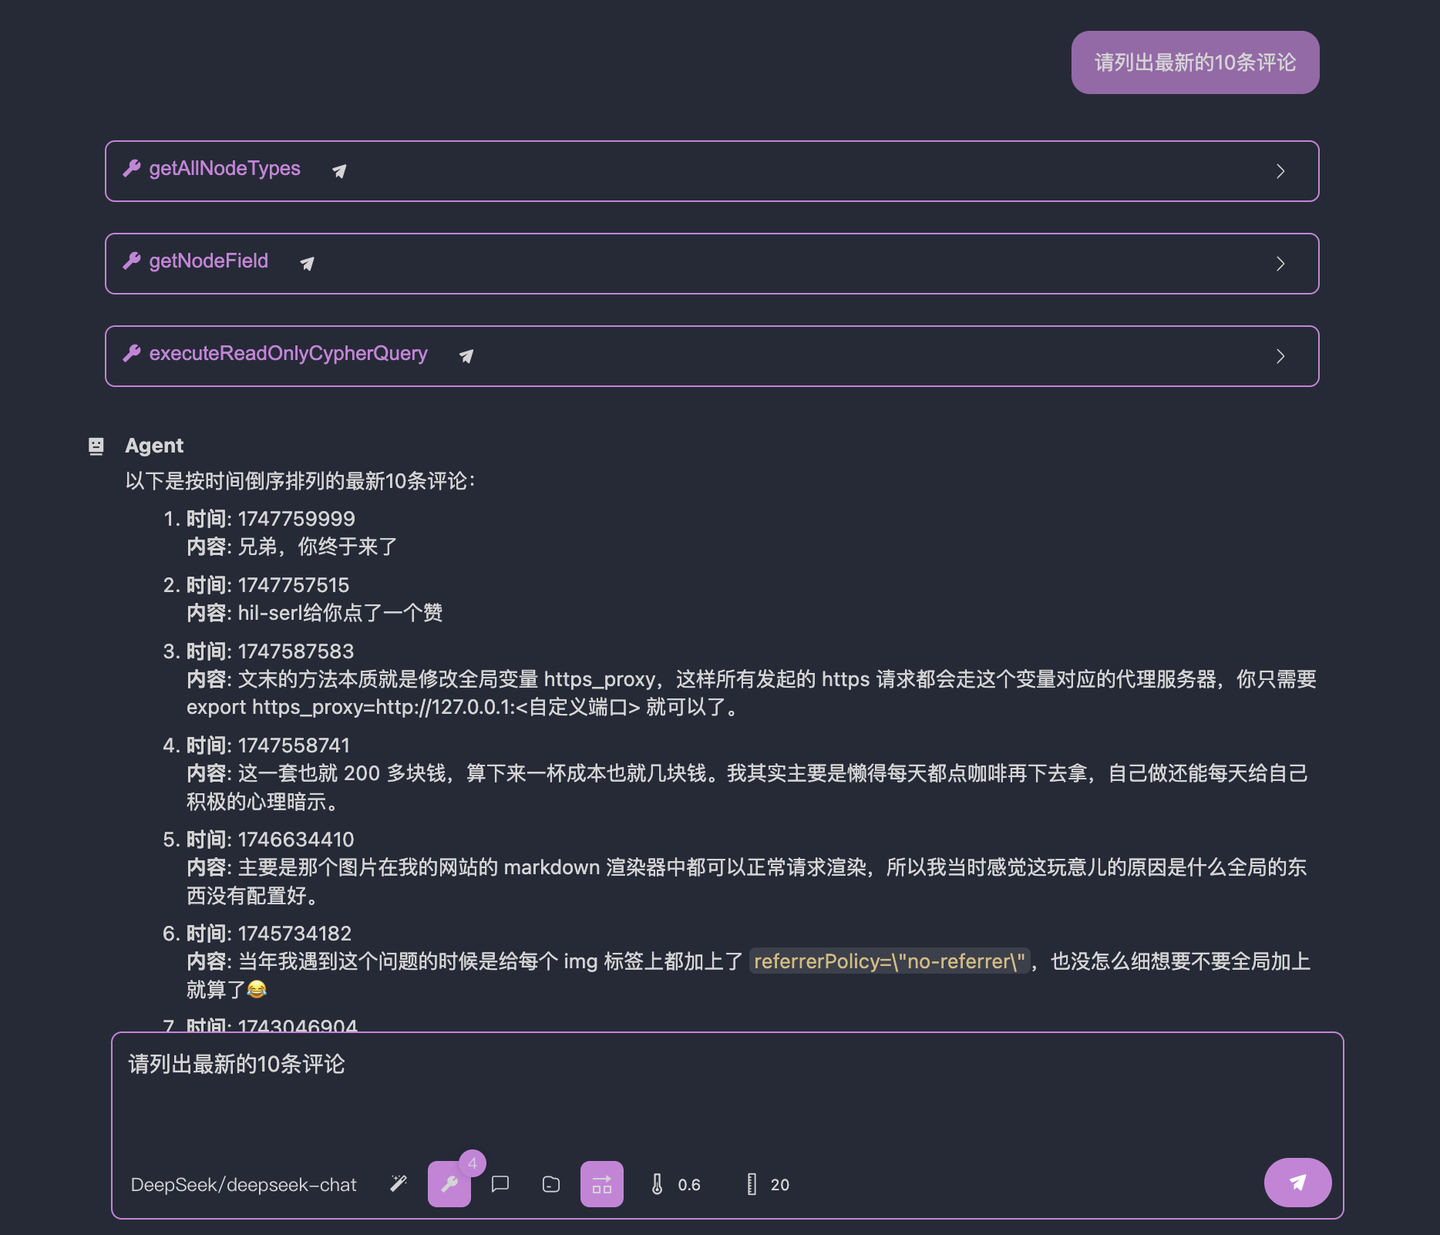
As you can see, without the system prompt, the LLM successfully executed the process. Perfect.
Summary
This tutorial walked you through implementing an MCP server for a read-only Neo4j database using Go and SSE. With this MCP, you can easily query the database using natural language without manually writing Cypher queries.
For cases where the LLM fails due to hallucinations, we methodically refined the system prompt to encapsulate knowledge. Finally, through the paradigm of Atomization Supplement, we packaged this knowledge into a more robust MCP server. Now, anyone can use your MCP server to query the Neo4j database with natural language.
Finally, if you find OpenMCP useful, don’t forget to star our project: https://github.com/LSTM-Kirigaya/openmcp-client
To further discuss OpenMCP, join our communication group (link in the GitHub repo).